Did ya’ll know I’m a photographer?!
I knew the stars would be bright in Montana this summer and couldn’t pass up the opportunity to photograph them. So before leaving Arizona, I tagged along on a night sky photography shoot with my incredibly talented friend Justin. In the dead of night on the Salt River, he patiently explained the basics and before long, I had captured this:
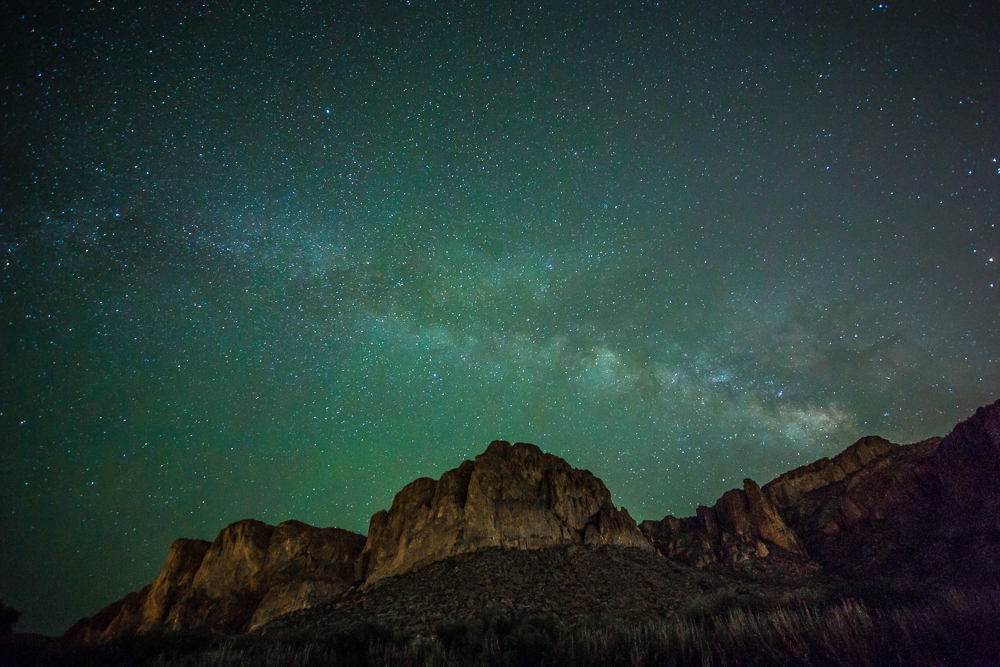
15 mm lens, ISO 2500, f/3.5, 20-second exposure
And this.
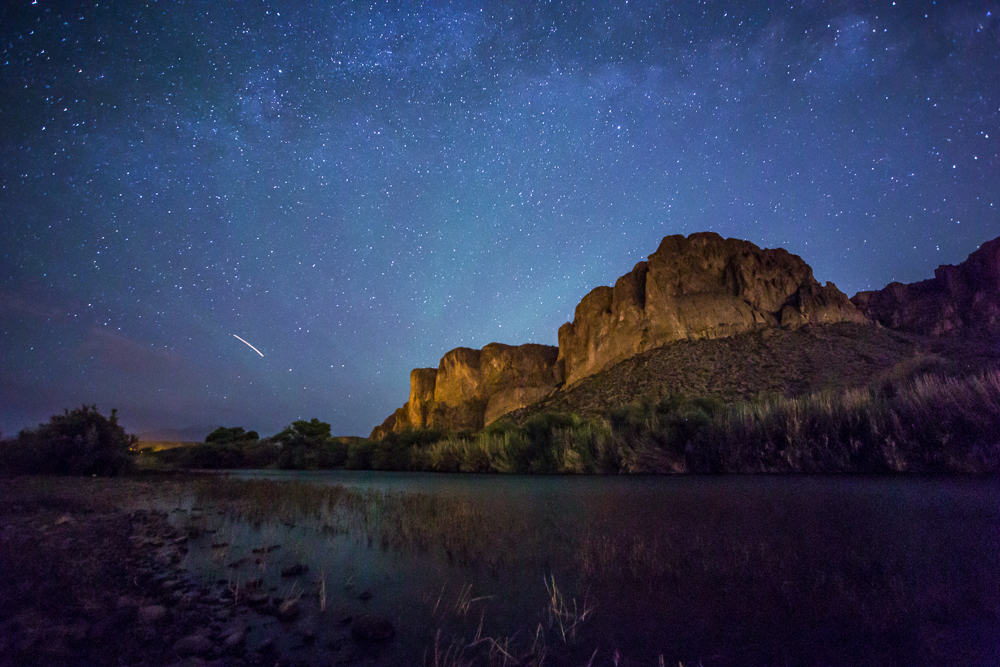
15 mm lens, ISO 3200, f/3.5, 25-second exposure
And just like that, I was hooked.
When I got to Montana, I couldn’t wait to get started. After a few weeks of full moon brightness and cloudy skies getting in my way, I was finally rewarded with a few pitch black nights. With the basics that Justin taught me under my belt, I started playing around and getting more adventurous with my photo shoots.
As I began posting more and more starry night photos on Instagram, people began asking me for tips. I thought I would share the basics here, in case you might want to try night sky photography too!
(Keep in mind, this is just a beginner’s guide. There are tons of great resources out there to take you further if you want to get more serious about it.)

1. Equipment – DSLR camera and tripod.
(This tutorial is for DSLR cameras.) Last year I upgraded to a Canon 6D after spending a few years shooting and practicing on a Canon Rebel T3. I love the Canon 6D because of how well it shoots in low light situations (and night sky photography is pretty much the lowest light you can get).
Any DSLR camera will work for night sky photography, but the nicer the camera, the less noise (or grain) you will see in your photos.
A sturdy tripod is very important for night sky photography because your camera will be shooting for 10-25 seconds at a time, and you don’t want any kind of movement to blur your photo. If you don’t have a tripod, you could always try propping up your camera, but be careful! You don’t want to break it!
I bought a used tripod from Justin (score!), but you can find new and used tripods in all price ranges.
2. RAW.
Make sure you set your camera to shoot RAW files. These photo files are huge, and you will need a good amount of storage to upload them, but it’s worth it because you will be able to recover tons more light and color during editing. I upload my night sky photos straight to an external hard drive to save space on my computer.
3. Manual Mode.
Make sure your camera is set to Manual (‘M’) mode so you have full access to change the settings. If you need help with how to change any of your settings, please consult your camera manual.

4. Get away from city lights.
To see a bunch of stars in the sky, you have to get away from light pollution which means getting away from the city. The good news is, you probably won’t have to go too far. I was shocked to be able to take the Salt River photos only 45 minutes from my house.
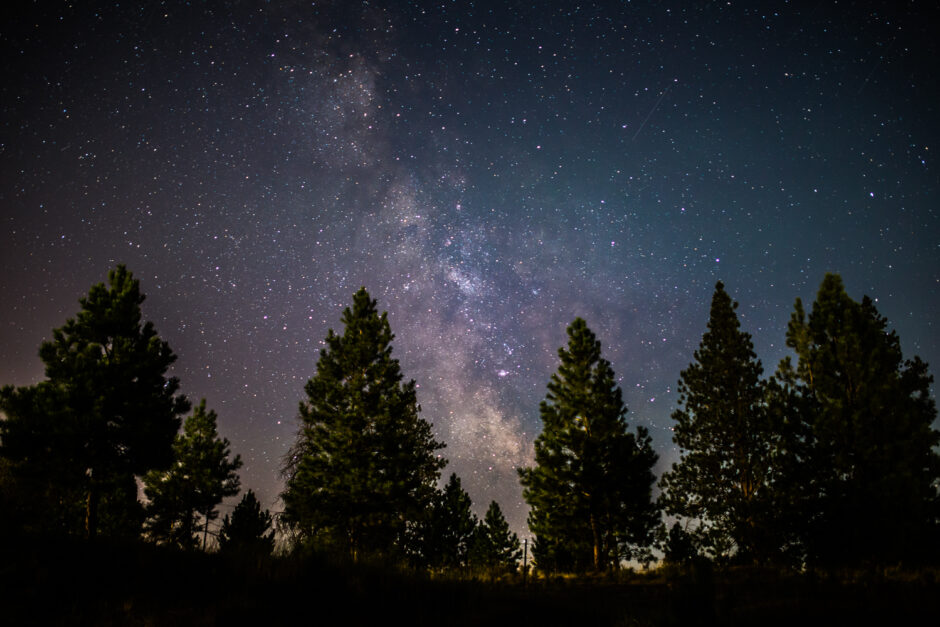
And here in Montana, the skies are dark enough that the photo below was taken right in front of our house. Just remember, your camera will be able to see more stars than your eyes can, so get out and experiment in different spots.
Also, the light of the moon can make a huge difference. For truly dark skies and Milky Way shots, aim for a night where there isn’t a bright moon.

35 mm lens, ISO 1600, f/1.4, 15-second exposure
But don’t let a bright moon keep you from shooting. You can use the moonlight to your advantage, like I did here where the moon illuminated the tree and grass, giving this shot a beautiful front-lit appearance.

35 mm lens, ISO 1600, f/4.0, 20 second exposure
5. 2-second timer.
Using a 2-second timer gives your camera extra stability on the tripod. This way, there won’t be any shake from your finger pressing the shutter button down. Simply press the button, step back, and two seconds later, your long exposure will begin.
6. Focus to infinity.
Last year when I tried (and failed) to start doing night sky photography, I couldn’t figure out how to get the stars in focus. Thankfully, Justin taught me to set my lens to infinity.
What does that mean? Make sure your lens is set to manual focus (MF, not AF. The button is on the left side of the lens.) Then twist your lens until the line from the infinity symbol is matched up to center line on the bottom. On my 35mm lens, that looks like this:

If you are using a lens that doesn’t have the infinity symbol, do this instead: Find a light far off in the distance that is big enough for you to focus on (you can use the moon if it is out). Manually focus on that light, and you should be good to go.
7. ISO 1600.
This is always where I start with my ISO for night sky photography. It’s high enough to let in the light from all the stars in view, but not so high that my photos are super grainy. If I go below 1600, I lose out on some stars. BUT, I do go below 1600 if I am shooting at the moon.
This is where you can start to play around with your settings depending on lighting conditions. So start at 1600, then see what works best for you on that specific night.
You can see in my first two photos at the top of this post that I went all the way up to 2500 and 3200 to catch more light, but in the photo below, I went all the way down to 400 to capture both moon and stars together.

35 mm, ISO 400, f/4.5, 15 second exposure
8. 500 Rule for Shutter Speed.
To capture the most of the night sky, you want to use the widest lens you have available. For me, that is usually my 35 mm Sigma lens (f/1.4). Whatever lens you use, divide that number into 500 to get a good starting point for your shutter speed.
For my 35 mm lens, I divide 500 by 35 and end up with 14.29. So I round that up and start with a 15-second exposure. Usually this is where I stay, but sometimes I go up to 20 seconds.
Just be sure not to go over 25 seconds, or the stars will start to move on you. (Which of course can be really great for star trail photos, but that is an advanced lesson for another day that I still need to learn myself.)
9. F-Stop below 4.5.
Ok, f-stop talk can get confusing since large aperture means a small number and vice versa. So let’s just stick with numbers. Generally speaking, the lower your f-number, the more light that can come in, and the better star photos you will get.
But with some lenses, some vignetting can occur at the lowest number, so play around with it. With my 35 mm lens, I can go all the way down to f/1.4, but I sometimes find f/2.0 to be clearer.
One note about the f-stop: If you are at ISO 1600, and your 500-rule exposure time, and your photos are turning out too bright, the f-stop is the best thing to change. You don’t want to lower your ISO, or you will lose out on some stars (unless, like mentioned above, you are shooting towards the moon).
So play around with a larger number f-stop. There have been times when I have even gone above 4.5, but this is usually when I am trying to capture stars with too bright of a sky.
*Remember, all of these tips are starting points. You will want to adjust as you go along and experiment with your own equipment.
10. Star Walk App.
This is completely optional, but I find the Star Walk app most useful when I am wanting to take photos of the Milky Way. You can hold your phone up to the sky and find the most concentrated section of stars to shoot.

Star Walk 2 App

35 mm lens, ISO 1600, f/1.4, 15-second exposure
So there you have it. With these 10 tips, you should be able to get out there and start taking your own breathtaking night sky photography.
Questions? Please Ask!
May i just say that this is the most thorough and well written instructions to photographing the night sky I have read since buying my DSLR camera…..thank you very much, I look forward to trying this out
Awesome photos and instructions – thanks!
Great article, thanks for the tips! I am wondering if you have any suggestions on a camera for a beginner? I would love to take night sky shots but as it would just be a hobby and not professional, I can’t justify spending thousands of dollars on a camera.
Hi Anna, that is a great question! To be honest, the lower quality cameras have a hard time picking up the starlight without having a lot of noise in the picture. If I were you, I would start looking at refurbished cameras, maybe from the Canon Rebel line (The T5i or T6i might be doable).
Love the description and the images! I just started in the world of DSLRs and astrophotography is a particular interest of mine. I was just wondering if these are the RAW, unedited pictures or if you have to edit them to achieve this variation in color? Also, do you recommend a fixed lens or a zoom lens?
Hi Lexi! I shoot in RAW format but edit the photos with Lightroom. Depending on what you want to do, you can choose to edit a little (to bring out the light in the stars and adjust for contrast) or edit more (to play around with color and temperature). As far as lenses go, you want to use the sharpest lens possible which is usually fixed. I like to use my 35mm fixed lens because it is the sharpest and best in low light out of the lenses that I own. I hope that helps!
This is very helpful! I’m going to give it a try on my upcoming trip! Thank you!
Finally! A general quick-start guide that is actually written for beginners! It’s simple, to the point and offers up enough basic information and helpful tips to get a beginner started without being overwhelming. Well done!!
Thank you, Kristen! I appreciate your kind words.
Hey, I just read your article (haven’t experimented with it yet) but I really love how clear your advise was and so simple to understand, LOVE it!!!
Thank you, I’m so glad!
Great tutorial, have you done any star trails? How long would it take for the complete circle of star trails that I have seen?
I haven’t done star trails yet. But my friend Justin who taught me how to get started in night sky photography does them, and I think they take an hour or so.
I absolutely love this tutorial and my first attempts at star photography turned out great! Have you put up the part two? I’m interested in ways to better edit my photos!
I’m so glad you enjoyed this tutorial! I have not done the editing post yet, but I will work on it soon, I promise!
What time do I need to be out to take theses shots
Verrrrry late. The later the better, and the less light (even moonlight) the better. Summer is the ideal time. I took most of these between midnight and 2am.
Manual setting and Manual focus on lens. Those two things solved my problem. Thank you. I am hooked.
Oh yay! I’m so glad.
Hi Alysa
Came across this page on pinterest.. Love the simplification of the rules here for night sky photography. You mentioned this post is for DSLR, but will mirrorless camera work as well?
I am using Sony a6000.
I’m sorry, I don’t know much about mirrorless cameras. The biggest factor is going to be how well your camera does in low light, how much noise you get at a high ISO, and how sharp your camera shoots at long range.
“Coming soon…Part Two where I will teach you all about how to edit your night sky photos.”
…………………anxiously waiting!!!!!!!!!!
So obviously this is far from soon. Ha! Hoping to get it up sometime this fall. 🙂
I have been toying with nite shots for a while and you very well written tutorial has pushed me to try it. Luckily the rear of my house has minimal light intrusion so i will experiment there first and go back and forth to your wise words on my computer to fine tune things. Thanks for your advice.
I have a Nikon – AF-S DX NIKKOR 35mm f/1.8G Standard Lens. It doesn’t have the infinity symbol, do you have any suggestions for the settings to use?
The infinity symbol is not always exact. Sometimes a lens will actually focus right before it or some lens will go past infinity. Start there with your focusing on a distant light source. Then use your live view (on Canon or preview, I believe on Nikon) zoomed in and adjust your focus to get a crisp shot. It is also helpful, if you can carefully put a piece of masking tape over your focusing ring and the barrel of your lens, to keep your focusing ring from being accidentally moved.
Hello! I just got a Canon Rebel T5 camera and would love more information on how to do this. I live here in Montana and night sky photography is really my main reason I wanted to get into it. I know that the Rebel T5 is an entry level DSLR and am wondering of its capability to do night time shots before I go all out on lenses. Which brings me to another thing, I have been doing some research on lenses to purchase. Samyang 14mm F2.8 is so far the most promising (and affordable) option out there that I have discovered. Thank you in advance!
Wow! This is more than incredible, even more with that help of the App…
I have a Fuji XT1 with a 35mm f/2 lense and also a Nikon D5500 with a 18-55mm and the 55-200mm.
Which would you recommend me to use for this night compositions?
I live in Venezuela and love capturing the amazing sunrises, sunsets and even the moon in all it fases… but really love all the theme referred to the sky and would like to do this pictures by my self…
So, I’ll go to Spain for the Xmas holidays and would like to try it…
But I see in your pictures and from so many other photographers, you do it in mountain places, but I would like to try this is the beach, with the ocean, and all that…
Can I still do this with your advices? Or there are another ones?
Thank you so much for your detailed explanation! I’m grateful!! Gettings from Venezuela!
Hi Cardina! I’m so glad my tutorial has been helpful. I’m not sure which camera you should use, but I would go with whatever is sharpest and best in low light. And YES, get some great shots at the beach, those are some of my favorite! The main thing is to be as far away from light sources (cities, streetlights) as possible. You should check out Milky Way Chasers to see some incredible shots from all over the world. https://www.facebook.com/milkywaychasers
Good luck, and I would love to see what you come up with!
I was driving to work this morning and the moon was absolutely beautiful it was lighting up everything. I have my camera on hand ALWAYS just in case. (I am new to this whole photography thing – purchased my DSLR just before Christmas last year so we are still getting familiar). I pulled over to see if I would be able to get a nice night photo. Nope. I failed, so I pull into work and pull up Google before I head in for the day and search “Night Photography for Canon T5i” and your article pulls up. It is probably the most clear instructions I have ran into so far. I will be trying out your tips this weekend. Thank you for the good read, wish me luck.
Hey Shaylie, did you get some good pics over the weekend?
I am thrilled with this article and I just hope I can find your second part (and third?). I have wanted to do some of this for so long but had no idea how to start. Thanks for your easy to understand instructions. May I ask you to explain how people I know use some magnification along with their camera–like a telescope.
in the photo of the single tree, and the very blue background, what do you use for your editing software?
so if i take the pics like u said they will come out like yours or do i have to do something with them after i take them